Retrofit Kit for Dash Air Temperature Control Switch and Water Valve
SGM Model K6201 Retro-fit kit replacing “H” style electronic water valve system with updated “in-line” electronic water valve system using the existing “H” wire harness
Control panel instructions
- Remove screws retaining control panel to dash, and slide control panel out from dash, save retaining screws for re-installation.
- Disconnect power and ground (2 gang connector) for the temperature switch, then disconnect 7 gang connector from temperature switch.
- Remove knob from temperature switch and save for re-installation.
- Remove retaining nut, lock washer, and washer from temperature switch. Slide temperature switch, spacer and lock washer out of control panel, save spacer and lock washer for re-installation.
- Cut-off 7 gang connector from main water valve harness, directly behind connector. Reference diagram below. Discard remaining portion of connector.

- Strip lt.blue, yellow, and orange wires .250“ then crimp to new switch/wire harness assembly included in kit to existing wire harness. Crimp as follows: crimp lt. Blue to black.,Yellow to yellow and orange to red, reference diagram below.

- Install new switch, spacer, lock washer onto control panel in correct orientation, and tighten with washer, lock washer and nut, re-connect power and ground to switch.
- Tighten knob to temperature switch, and verify orientation and rotation. Re-install control panel into dash
Water valve instructions:
- Disconnect 6-gang connector from electric water valve.
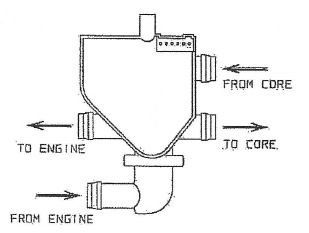
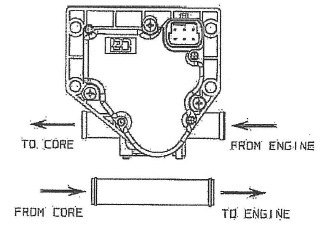
- Identify heater hose positions, for: to and from engine, and to and from heater core. Reference diagram below. Please note orientation of valve.

- Remove clamps retaining electric water valve to heater hose. (To prevent coolant loss, sneeze off, or plug heater hoses after removing from water valve) remove water valve from system.
- Install new in-line electric water va vle, and in-line hose splice. Reference diagram below. Please note orientation of valve.

- Clamp new in-line valve and splice to heater hose.
- Connect wire harness from new in-line valve into existing wire harness, previously plugged into “H” style valve.
- Verify operation of temperature control valve and switch.
